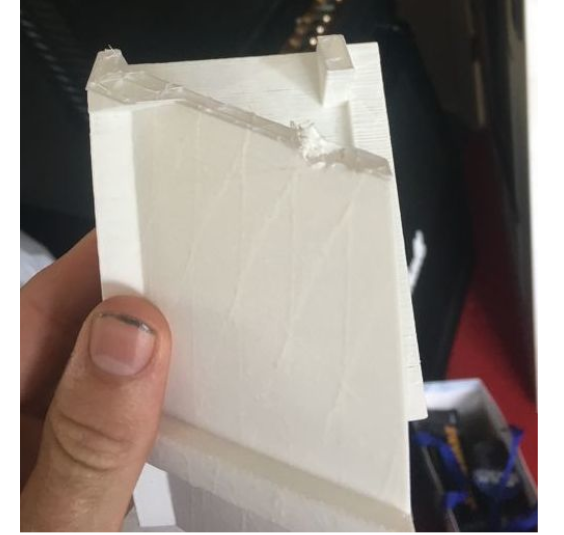
Failed Print Of The Skirt
This month has been rather hit and miss for me. I've had countless issues with my 3D printer which has set me back both financially and with my progress for R2. I have tried to work with the 3D files published by Michael in the UK Group and some have worked, some have failed. One thing I need to remember is that with me having a Senna Wooden frame, the 3D parts were designed for a CS:R 3D frame. I have since managed to get it working (I think) and I'm currently half way through printing my skirt (for the bloody droid!) Had a few issues with it as some layers weren't fusing together for some reason, remasking the bed has become a royal pain! Using a 200 Degree Nozzle with a 45 Degree bed temp, Pritt Stick and Masking Tape and I've recently started using a brim as the corners were lifting and about half way to three quarters of the way through the print moved from the bed. Yeah... I heard your reaction...
Testing The Blue..
I bit the bullet and glued my front skins on. Managed to pick up some contact adhesive from Screw fix for about £4.00 and it worked great.
The only issue I have is the top edge doesn't seem to have stuck no matter how much I clamp it and how much stuff I put on it. Strange...
As well as gluing them I counter sunk the screw heads as I screwed my frame into place and glued it as well, I filled the holes and covered the screw heads,
I was going to wait for some reason but then I figured " Well, I've glued them and this stuff isn't coming off So why am I waiting?".
I was advised by a few members of what to use to fill holes and cover screws on the styrene skins... I decided to go against that as I was positive
what I had would work and it would seem some people had a bad experience with it.
I didn't and still don't have the money to buy new stuff all the time, so I had some Poly filler lying around, fills holes, gaps, and cracks.
I did read up and certain Poly fillers fill different types for example a cheaper one will only really fill small cracks whereas a more expensive one can
fill large cracks, holes etc. Typically, the one I had was only for tiny stuff, I went to my local Wilkinsons and picked some up for a few quid.
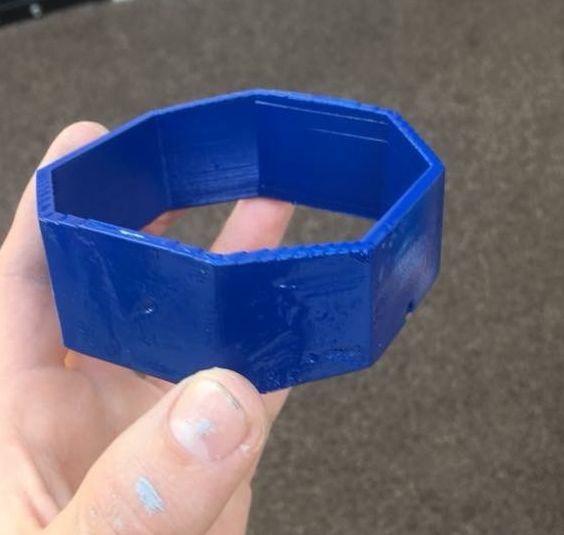
At the same time I bought some paint! A Wilkinson owe brand blue and some rust-o-leum white, primer and clear gloss. You can image how this went....
I actually went surprising well if you take my rubbish painting skills out of the equation! I've included some images of the test on an octagon port, I didn't
leave it to dry very long and that was only about 2 coats, safe to say I was very impressed with it.
I'm a genius, simple
Final post before I sign off, I came up with what I think is quite a genius idea, I wanted to get these legs mounted but I had not spacers...
I did have some M10 100mm Coach Bolts, nice and thick! Perfect for the legs I thought, only problem was I still don't have any spacers. I did contemplate
printing just a solid circle to use as a spacer but for one of those at the correct thickness was about a 9 hour print.
Not too bad in the grand scheme of things but when I had only doing 1-3 hour prints at the time of discovering this, I was a bit shocked.
After the 7-8 1/2 hour prints to discover it's failed within the last 5 minutes, 9 hours doesn't phase me at all!
Anyway, my genius idea! When I got my CR-10, it came with a test spool of filament, I'm still trying to find out the size of the spool but I actually
found it is a very good spacer! Put some strips of it, spray it silver and jobs a good 'un! Had to drill a couple of holes for the bolts to go through
and I found it was easier to have two nuts per bolt, the bolt goes through the wooden side plate, through the first part of the spool, before you feed
it through the next hole, put a nut on! This will help it to stay put! Eventually you can swap for the T Nuts or Locking Nuts but these seem pretty
solid for me! Once this is one, feed the rest of the bolt through the second hole you drilled on the spool and then through the spacer that goes on
the back of the leg and finally into the leg and stick your nut on it!